In this post we will see how to add Web API support to an existing MVC project. Sometimes we have a project that started as simple ASP.NET MVC site, maybe even as one single page project, with no more functionality than to display some simple information in the screen. As time goes by new needs arise, new features are requested, and it becomes convenient to develop a Rest API that will be used by the client to query the server for more information.
For starters we need to create a basic MVC project that represents our basic deployed MVC application, and then we will see how to add to the project Web Api support, and how to query the REST API from our original application using Ajax. Finally we will see some of the common mistakes that we make when adding a WebAPI controller to an existing – not WebAPI – project.
Here are the four parts in which this tutorial is divided:
- Creating our sample MVC Project
- Adding WebAPI support to our MVC Application
- Consuming the RESTful web service
- Things that can go wrong
1.Creating our sample MVC Project
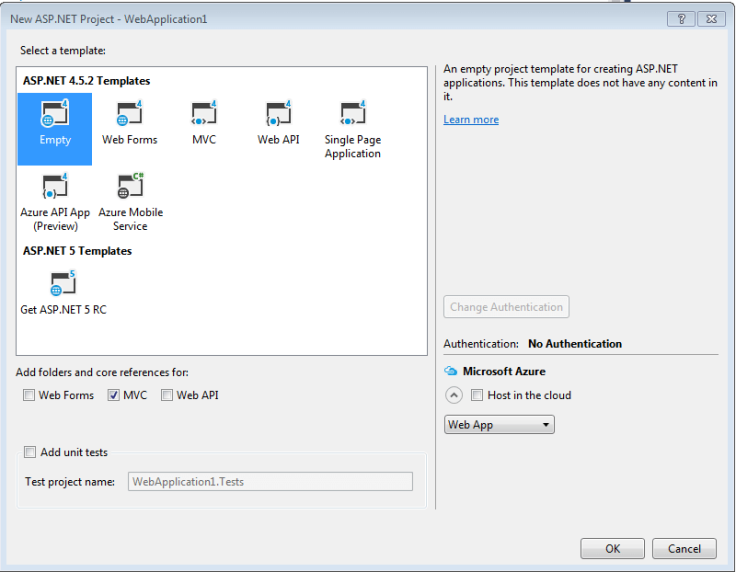
1.1.Create a new project of type ASP.NET web Application

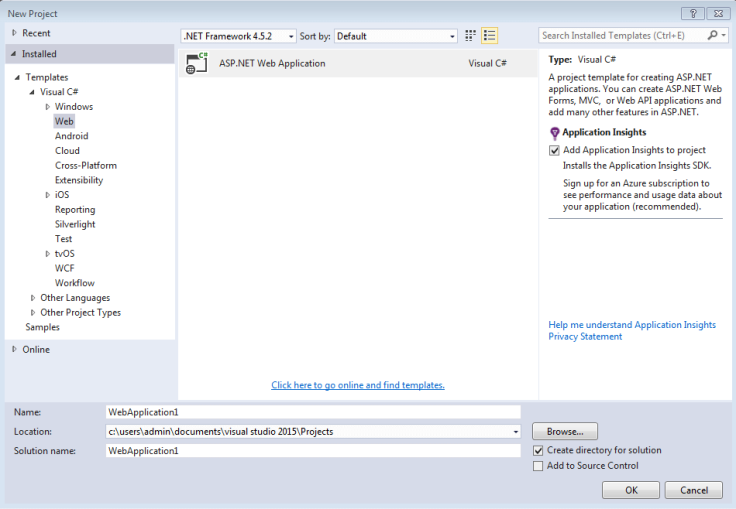
For this example an empty ASP.NET web project will suffice. We will just check the MVC option so that the basic folder structure corresponding to an ASP.NET MVC project is created.
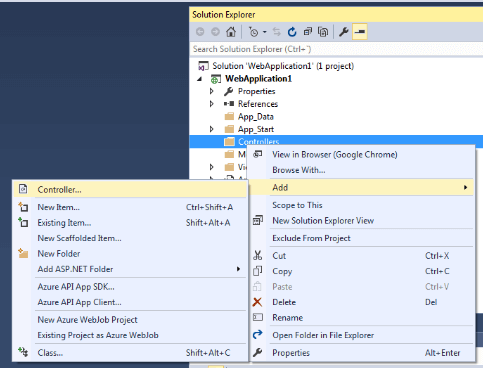
1.2. Adding a Controller for our Home Page
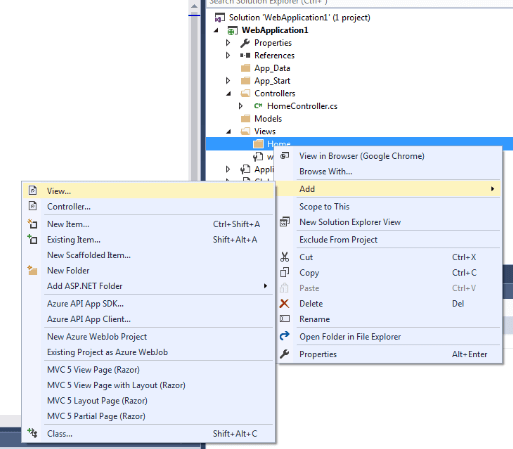
Next we need to create a controller for our Home Page in the Controllers folder. We can do that selecting Add >> Controller … …
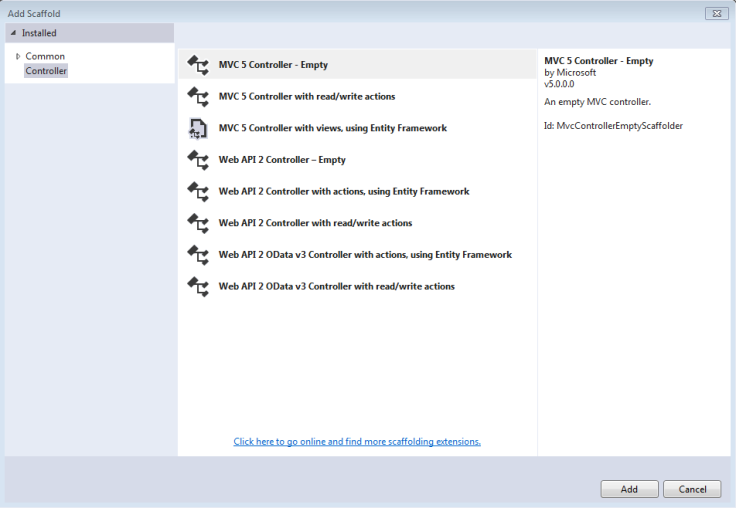
… and choosing MVC 5 Controller Empty from the available options in the Scaffold Dialog (note that the controller name must end with “Controller”, for example HomeController)
Our Home Controller will not have much to do besides displaying the view:
using System;
using System.Collections.Generic;
using System.Linq;
using System.Web;
using System.Web.Mvc;

namespace WebApplication1.Controllers
{
    public class HomeController : Controller
    {
        // GET: Home
        public ActionResult Index()
        {
            return View();
        }
    }
}
1.3. Adding the Home Page View
Now we can create a View for our Home Page; we will select Add >> View … …
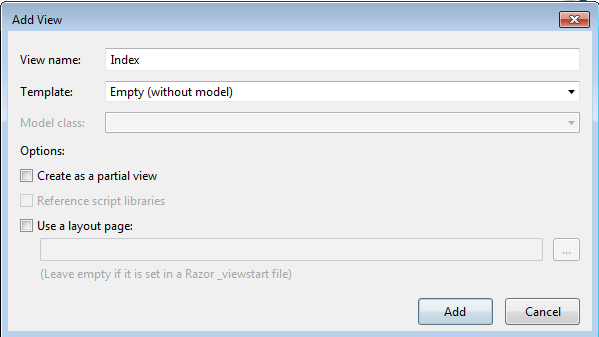
… and write some simple HTML. In this case when the browser opens our http://localhost/Home/Index it will display a classical “Hello World” message.
@{
    Layout = null;
}


    Index
<h1>Hello World</h1>
1.4. Adding JQuery Support
Later in the game we want to add REST API support to our web application, and consume the RESTful webservice from the client (the end user browser). To simplify the development necessary in the client side, we will add the JQuery library to the project. We will use JQuery to do the GET/POST requests to the RESTful web service. We can either download the JQuery library from its official page, or simply include it from a CDN:
With this we finally have a working MVC application, and we can move on to the next step: how to add WebAPI support to the MVC project that we have just created.
2. Adding WebAPI support to our MVC Application
2.1. Adding the necessary WebAPI packages
In order to add WebAPI support we need to add some extra packages to our project. That can be done using the NuGet Manager:

The bare minimum of packages that we need to install are the Microsoft WebApi package, and the Microsoft WebHost package.
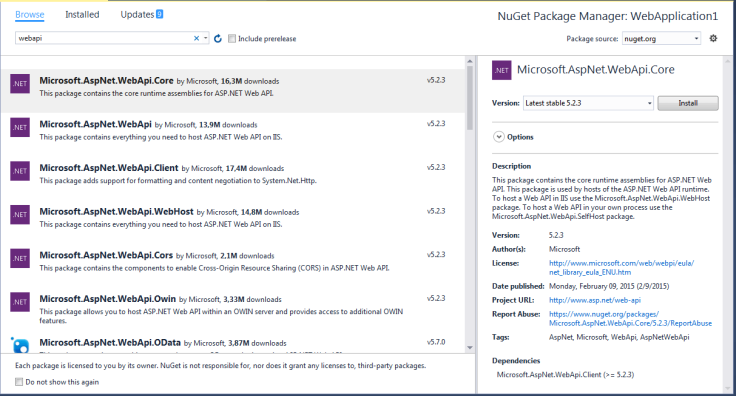
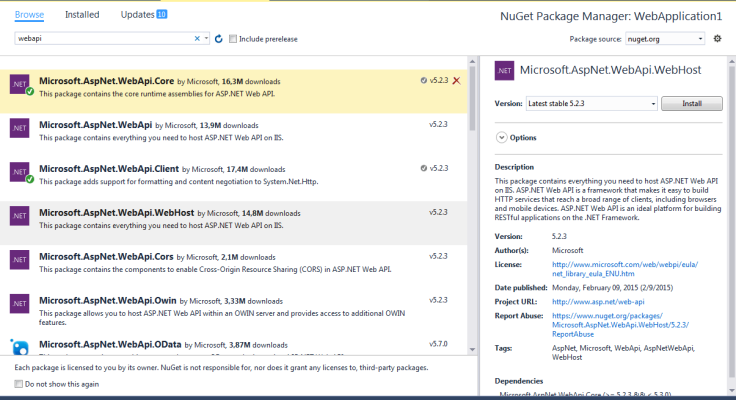
Once we have accepted the License Agreement the NuGet Manager will install the required packages along with their dependencies.
2.2 Configuring the routing
We need to create a WebApiConfig.cs file in the App_Start/ folder. In this file we will define the webAPI specific routes (much as the RouteConfig.cs file is used to configure the ASP.NET routes):
using System;
using System.Collections.Generic;
using System.Linq;
using System.Web;
using System.Web.Http;

namespace WebApplication1.App_Start
{
    public static class WebApiConfig
    {
        public static void Register(HttpConfiguration config)
        {
            config.MapHttpAttributeRoutes();

            config.Routes.MapHttpRoute(
                name: "DefaultApi",
                routeTemplate: "api/{controller}/{id}",
                defaults: new { id = RouteParameter.Optional }
            );
        }
    }
}
In the Application_Start method of the file Global.asax.cs file, we will add a call to GlobalConfiguration.Configure; be careful to place it before the call to RouteConfig.RegisterRoutes(RouteTable.Routes):
using System;
using System.Collections.Generic;
using System.Linq;
using System.Web;
using System.Web.Http;
using System.Web.Mvc;
using System.Web.Routing;
using WebApplication1.App_Start;

namespace WebApplication1
{
    public class MvcApplication : System.Web.HttpApplication
    {
        protected void Application_Start()
        {
            AreaRegistration.RegisterAllAreas();
            GlobalConfiguration.Configure(WebApiConfig.Register);
            RouteConfig.RegisterRoutes(RouteTable.Routes);
        }
    }
}
2.3 Creating our WebAPI controller
Finally we are are ready to add a WebAPI controller to our project. As we did in the first part of this tutorial we will select Add >> Controller … to add a WebAPI controller to our Controller folder, but this time in the Scaffolding Dialog we must select the WebApi 2 Controller – Empty.

This will create an empty class, inheriting from ApiController, where we can define our methods. Let´s add a method – GetStudents – that returns a list of students.
Here is what our Student class would look like:
  public class Student
    {
        public String Name {get; set;}
        public String Email { get; set; }
    }
In a real life situation we would be getting our students from a database,etc., but for this example we can use a simple function that creates and returns a list of Student objects from an array of student names:
public List GetStudents()
        {
            List studentList = new List();

            string[] students = { "John", "Henry", "Jane", "Martha" };

            foreach (string student in students)
            {
                Student currentStudent = new Student
                {
                    Name = student,
                    Email = student + "@academy.com"
                };
                studentList.Add(currentStudent);
            }
            return studentList;
        }
Finally we will specify a route prefix to indicate the uri to use with all the methods in this controller:
[RoutePrefix("api/Students")]
 public class WepApiController : ApiController
We can also add a route to the methods in the controller:
[Route("GetStudents")]
 public List GetStudents()
This is how our WebAPI controller looks like, after all the introduced changes:
using System;
using System.Collections.Generic;
using System.Linq;
using System.Net;
using System.Net.Http;
using System.Web.Http;
using WebApplication1.Models;

namespace WebApplication1.Controllers.webapi
{
    [RoutePrefix("api/Students")]
    public class WepApiController : ApiController
    {
        [HttpGet]
        [Route("GetStudents")]
        public List GetStudents()
        {
            List studentList = new List();

            string[] students = { "John", "Henry", "Jane", "Martha" };

            foreach (string student in students)
            {
                Student currentStudent = new Student
                {
                    Name = student,
                    Email = student + "@academy.com"
                };
                studentList.Add(currentStudent);
            }
            return studentList;
        }
    }
}
With this we had added a WebApi support to our MVC project, and we can call the method defined in our WebAPI controller from the end user browser.
3.Consuming the RESTful web service
The only thing we need to do here to recover our students list from the Index.cshtml home page we created in the first part of this tutorial is to do a JQuery call to the following url:
http://localhost/api/Students/GetStudents
For example:
$.get(" http://localhost/api/Students/GetStudents", function (data, status) {
                alert("Status: " + status);
            });
Notice how by using in the WebAPIController, the RoutePrefix decorator, and setting the uri to api/Students, we can now use in the ajax call a friendly customized url instead of an /api/controllername/… type of url.
4.Things that can go wrong
Actually many things. As you may have noticed, adding a WebAPI controller to an existing ASP.NET MVC project is an extremely simple task that can be achieved in a few minutes. Still, all too frequently, one finds out that after following all the steps the application will stubbornly refuse to work properly: our ajax calls to the webapi service that we just defined will be answered with a “URL not Found” error. And since this error message is not exactly very helpful when it comes to determining at which point of the process we did go astray, we may end up wasting hours trying to figure out what we did wrong.
Here is a quick checklist of things to check up, if we encounter the above problem:
- Check the names of the classes, and the files: our API controller must be in a file whose name ends in Controller.cs, and the class name must also end with the word Controller
- Did you add the call to GlobalConfiguration.Configure(WebApiConfig.Register) in Application_Start? Order matters here, make sure that it is called before the RouteConfig.RegisterRoutes line.
- Use the decorators RoutePrefix and Route to specify the URL of the service and action.
- Clean and rebuild the project to make sure Visual Studio is using your last changes.
Where do we go from here
Having learned the basic to add a web API controller to our project, there are a few things we can do to enhance the functionality.
For example, we can add custom Action Filters to a Web API. Action Filters allow to hook extra logic before, or after a method is called.

January 19, 2018 at 8:01 pm
In my case, the cause of a “URL not Found” error was routes.Clear() call in MVC RegisterRoutes method 🙂
LikeLiked by 1 person
October 28, 2018 at 4:29 pm
Hi There,
I’ve been trying to find my routing issue and exactly i was looking for what you put in this article api and mvc together and my problem has been solved.
Thanks, a lot
LikeLike
July 30, 2019 at 9:43 am
love this article
LikeLike
July 30, 2019 at 7:19 pm
Thanks :-). I am glad it was of help.
LikeLike
August 9, 2019 at 7:27 am
how can I call api controller method GetStudents() from my another controller action method (say, Index action from HomeController) Do I have to call HTTPClient even if both controllers are in the same project ?
LikeLike
August 11, 2019 at 3:31 pm
If both controllers are in the same project, i would suggest to move the body of GetStudents to a library project – or just to a service class in the same project- and the let both GetStudents() and Index() delegate in that library/service class.
In case you need to call from a controller a function from a controller in a third party web API then, yes, HttpClient may be your best option
LikeLike