If you are running Debian Stretch you probably have already Java installed, more concretely the OpenJDK version. But at times we need, or simply prefer, to work with the Oracle Java SDK. In this post we will see the steps we have to follow to install Oracle’s Java SDK in Debian Stretch.
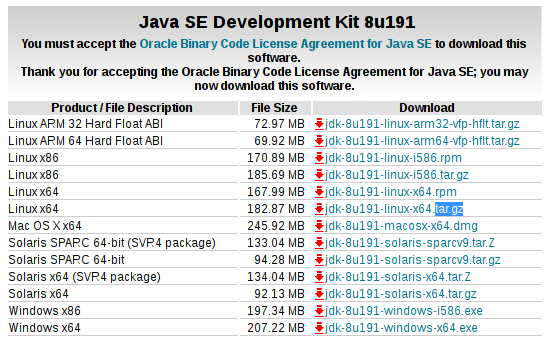
Download the Java SE Development Kit from the oracle site. Oracle provides various download options: You need to check the option “accept license” and download the tar.gz file.
Now we are going to create a folder in /usr/local for the Java installation
mkdir /usr/local/oracle-java
Then, we need to extract the content of the tar file in our recently created /usr/local/oracle-java folder.
tar -zxf jdk-8u191-linux-x64.tar.gz -C /usr/local/oracle-java
We can use this command to check the which java version we have installed. The same command can also be used to verify if our system it is defaulting to the Oracle’s java SDK:
java -version
In my case the output of the above command looked like this:
openjdk version "1.8.0_181"
OpenJDK Runtime Environment (build 1.8.0_181-8u181-b13-2~deb9u1-b13)
OpenJDK 64-Bit Server VM (build 25.181-b13, mixed mode)
Here we see that although we have installed the Oracle’s java version, the system is still using the openJDK version as the default one. Time to change that.
We can run the following commands in the cli to set the oracle JDK as the default JVM:
update-alternatives --install /usr/bin/java java /usr/local/oracle-java/jdk1.8.0_191/bin/java 1100
update-alternatives --install /usr/bin/javac javac /usr/local/oracle-java/jdk1.8.0_191/bin/javac 1100
update-alternatives --install /usr/bin/javaws javaws /usr/local/oracle-java/jdk1.8.0_191/bin/javaws 1100
Now, if we run the command to check the java version again, the output has changed to this:
java version "1.8.0_191"
Java(TM) SE Runtime Environment (build 1.8.0_191-b12)
Java HotSpot(TM) 64-Bit Server VM (build 25.191-b12, mixed mode)
If later on we want to change the java settings again, and make the OpenJDK the default version, we only need to run the following command:
update-alternatives --config java
And then we can simply select the JVM that we wish from the ones available:
There are 2 choices for the alternative java (providing /usr/bin/java).

  Selection    Path                                            Priority   Status
------------------------------------------------------------
  0            /usr/lib/jvm/java-8-openjdk-amd64/jre/bin/java   1081      auto mode
  1            /usr/lib/jvm/java-8-openjdk-amd64/jre/bin/java   1081      manual mode
* 2            /usr/local/oracle-java/jdk1.8.0_191/bin/java     1100       manual mode
Thanks for reading. If you find this tutorial useful you can click in the “follow” button at the end of the post to be notified of new posts.

Leave a comment